The Step-by-Step Workflow for Building High-Converting UGC Ads
Stop Prompting and Praying: The Practical Guide to UGC Ads

How to Actually Create an UGC Ad From Scratch
AI avatar ads can look deceptively simple when you only see the finished product scrolling through your feed. A creator pops up, holds a product, delivers a smooth pitch, and it feels like the whole thing was generated in seconds.
However, making an ad that doesn't look like AI takes a bit more care than typing a single prompt into a box. We recently held a webinar during which we built a creator-style video inside Kreator from scratch, and the biggest takeaway was that success comes down to a series of small, deliberate creative decisions rather than finding a "magic" prompt.
Here is an overview of the workflow for turning a rough concept into a finished piece of video creative.
Step 1: Set the Creative Intent First
Before opening any AI generation tools, establish what kind of ad you are actually trying to make. A polished, high-production brand commercial requires a completely different visual language than a casual, direct-to-camera UGC piece for social media.
Who is the character? (Age, vibe, style)
What is the setting? (A sunlit kitchen, a messy desk, a gym)
What is the camera perspective? (Front-facing phone camera, wide studio shot)
How does the product fit in? (Held in hand, sitting on a counter, unboxed)
Starting with these creative guardrails prevents you from aimlessly generating images hoping one sticks.
Step 2: Build and Ground the Avatar
When generating your initial avatar, basic descriptors like "woman in her late 20s" tend to yield hyper-polished, synthetic-looking characters. To make the avatar feel like a real person in a real place, layer in specific visual evidence.

What to Prompt | Why It Helps Ground the Image |
Skin Details | Small freckles, subtle under-eye texture, or natural skin sheen avoid the "airbrushed filter" look. |
Environmental Lighting | Specifying natural window light or overcast outdoor lighting gives context to the background. |
Framing & Imperfections | Requesting a slightly off-center phone-camera angle or loose hair straying in a breeze breaks artificial symmetry. |
Step 3: Refine the Reference Image Before Moving to Video
It is tempting to throw your first decent-looking render straight into a video model, but any visual flaws in the still image will compound once motion is added. Treat the first render as a draft and refine it until the visual foundation is rock-solid.
The Refinement Checklist:
Are the actor's physical features natural, imperfect, where you want them to be?
Does the composition match the platform (e.g., vertical 9:16 for TikTok/Reels)?
Does the background look lived-in rather than sterile?
Is the character's clothing and styling natural for the scene?
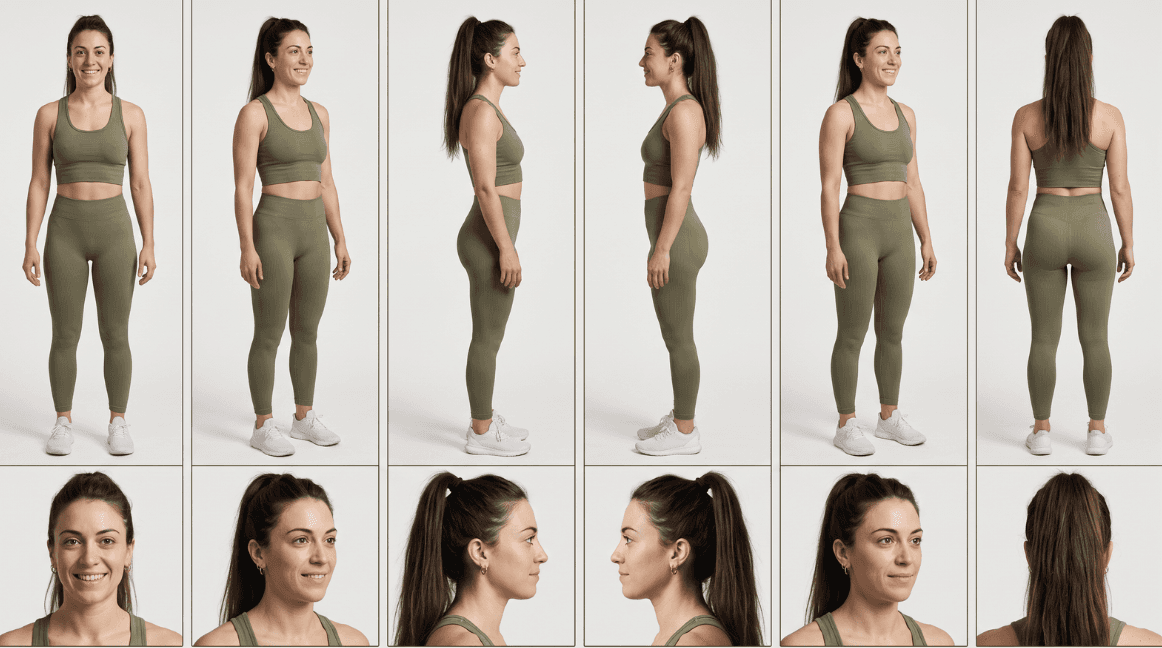
Additionally, once you have a still image your satisfied with, create an additional reference image showing the actor from different angles and directions. This will help prevent the video model from filling in the gaps when motion is added.
Step 4: Seamlessly Introduce the Product
Once the avatar and setting feel cohesive, integrate the actual product. For a video to work, the product cannot look like a flat PNG sticker pasted onto the frame, it needs to obey the lighting, shadows, and physical proportions of the character's hands and surrounding environment. Bringing product context directly into your workspace helps ground how the avatar will eventually hold, demonstrate, or react to the item.
The easiest way to accomplish this is to create another reference image with your actor holding your product (or appropriately positioned with it). This will provide the model with not only an accurate depiction of the product, but proper scaling in reference to the actor and scene.
Step 5: Map Out the Video Sequence
Image prompting describes what exists, but video prompting describes what changes over time. Before generating video, map out the scene as a short sequence of actions so you can prompt the movement clearly.
Use this mapping to help add context and detail to the prompting in the next step.
Step 6: Direct the Performance
When prompting the actual video clip, describe realistic physical micro-behaviors. Real human creators rarely stand perfectly motionless while reciting text; they shift their weight, glance away briefly, adjust their grip, and react before they speak.
Instead of:
"Woman holds product and speaks about it."Try:
"Woman slightly shifts her weight, brings the bottle closer to camera to glance at the label, smiles naturally, and resumes eye contact."
Using the direction you've defined in the previous steps, have your LLM model of choice create the polished video prompt.
Check out the prompt cheat sheet from our webinar for more details.
Step 7: Review and Iterate on the Output
Treat your first video render as a rough take on set rather than the final cut. Watch for small details: Is the camera movement too stiff? Is the hand gesture natural? Is the timing of the reaction off?
Because AI drastically cuts down traditional production time, you don't need to predict everything perfectly before hitting generate. Use each iteration to make quick, incremental adjustments to the motion, framing, or pacing until the final ad feels seamless.
Use 480p instead of 720p when iterating early versions to save time and credits!
The Real Shift is the Creative Loop
When you look at a finished UGC ad, it is easy to get caught up in the novelty of the technology itself- he fact that a synthetic creator can look, move, and speak with near-flawless photorealism. But focusing strictly on the tech misses the bigger operational shift for marketing teams.
The true value of this workflow isn't that a model generates a video with a single click. It's how drastically it shortens the feedback loop between having an idea and seeing if that idea actually works.
Instead of burning weeks on casting calls, product shipments, studio bookings, and post-production revisions, you can test hooks, adjust camera angles, refine visual textures, and swap out value propositions in a matter of minutes. Kreator doesn't replace creative judgment, it removes the production friction so you can execute, learn, and iterate at the speed of your team's ideas.
For a more detailed, step by step walkthrough of this process be sure to check out our full webinar replay:
How to Create a Realistic AI Avatar for UGC Style Ads